Showing posts with label Greenstuff. Show all posts

2012-12-27

Tentacoos and more Tentacoos

After seeing 40kaddict's article on a cheap and quick alternative for the tentacle maker I couldn't help but make some myself for my Slaanesh daemon princess.  I've run two batches so far, and tried a preliminary tentacle ball beast weapon thing on the daemon princess herself.


Above is the first batch of tentacles, and most of them ended up rather thick.  So I worked out a second set (below) after the first had cured. Which turned out better, I tried twisting a couple together in this batch trying to figure out how to pose the tentacles while the greenstuff is still uncured.  I'm sure a few cycles down the road I'll actually start being happy with them.


I have a couple Slaanesh project ideas currently, to use tentacles in, so i figure many will get used anyway.  I'll probably end up placing these and making more to mount while still uncured to make them look like they fit better together.

2011-06-16

El'larrun Special Character

Whee, assembly done.  Not super happy with it, but that's just my skill not reaching up to where my wants/desires lie.  I started with a stealth suit and cut it into many, many pieces.  Some of you might recognize the legs from the old O'larron sculpt which was cannibalized for this.  The rail rifle she has equipped came from a Sniper Drone (I believe, not positive). Her head is a daemonette head from the new plastic range, sadly her nose is crooked.

She's going to be painted green to match the rest of my army, though I think I'll try the partially disengaged stealthfield effect for her.

2011-05-05

A Space Ship Module fully Assembled

Well, I've been quiet the last couple months.  This has been due to a number of things that I won't bore you with.  Anyway, I've done some work on the space ship modules as you can see in the image above.  It's the first module that has all it's parts together.  I've started the long process of filling cracks and gaps so I can make a mold of it.  Come to find out, Greenstuff and Hydrocal don't make the best of friends, though that probably has more to do with my Greenstuff working tools.  While Hydrocal is much harder then Plaster of Paris, it's still a rather soft plaster (Unlike Merlin's Magic or the like, but Hydrocal is the hardest stuff I can get locally... That I know the name of at least) and my tools are all metal.  So if I'm not extremely careful, I scratch the parts up while trying to fill gaps...  I'll probably end up shifting to my (non-hardening) modeling clay and a rubber tipped tool (assuming I can find/make one cheap).

Depending on how well this mold turns out I'll probably work hard and create molds for a number of other sections... Once I figure out which sections are worth casting.  I've had people offer very generic ideas for which modules they'd like to see, so I've dug up my tileset I was playing with using a program called Tiled which I've added with the other pictures of the T-intersection below.  I haven't worked out actual brick layouts for the modules in the bottom half of the tileset, but they're there mostly for completeness sake at the moment.  The image tiles are 36x36 pixels with a 1 pixel spacer between tiles (useful if you decide to try out Tiled).

Anyone with the time and/or inclination, I'd love if you would work out some table layouts and send me a list of how many of each module would be needed to create it, or the layouts themselves and I'll count the modules (Credit will be given for assistance with 'set' quantities, and for any layouts I post here).  The physical modules fit in a 6" by 6" gridwork, so a standard Special Operations: Killzone 4' x 4' table would be 8 modules to a side for a total of 64 modules.  A 40k sized table of 4'x6' would be 96 modules in an 8x12 layout.  I've worked out a number of 3' x 3' and 4' x 4' designs over the months (years now? O.o;; ) I've thought about this project, and have come to the conclusion that I need a lot of other player's ideas on what a maze of sci-fi twisty-winding paths should look like.  My local friends have been completely unhelpful with a 'whatever is fine' attitude.

Photobucket
Photobucket

2011-03-31

Noise Marine WIP

Well, I've made some progress on my new Noise Marine that's going to be assisting my Chaos Cult in Inquisimunda.  The guitar has been fun to build so far, but I'm not sure what to do to provide strings for it.  I'm gonna have to greenstuff on some knobs (or find some 1/32nd inch plastic rod).  She'll be holding her guitar by the neck in her left arm.  I was kinda hoping for a pointing right arm (the only one I've been able to find is also a powerfist, so fail there).  but at the moment it looks like I'll be modifying a plasma pistol to be a Sonic Blaster.  Her right leg ended up being pinned on a bit low so I'll be trying to shift it up a little bit as well as continuing to greenstuff details and fill gaps.  The helmet will receive a band over the top so the horn mounts over the ears will look like massive headphones.  Not positive where I'm going to put the helmet as she's going to be bare headed.
Here's the parts as they stand so far.  A friend suggested that they look like they're on display to warn away people.

2010-02-22

Female Fire Warrior Torso progress


Sense my last update, I've ground down the stomach area all around, slimming her a lot and added the little flange things on the sides of the armour. This step was a lot easier then I thought it'd be. I decided I really didn't like the first run of the articulated panels on the back of the 'soft' area, so removed it before the stomach slimming. Afterward, I added them back in. I really like how the back one came out, even if it did end up crooked. >.<

I neglected to remember to put the lines in the front articulated section, so I'll try carving them into it. Failing that I'll pull it off and try again.

Overall I think it's coming along nicely. Hopefully I'll find a place to do some base casting to finish up my first set of fire warriors, they're getting antsy for their new bases.

2010-02-11

Nurgle Terminator

This isn't actually a new project, I've been working on it off and on sense around August 2009, but I noticed it sitting there and thought I'd post about it. I don't play Chaos myself, but my gaming group was discussing ideas a long time ago and our resident minion of Nurgle wanted themed terminators. After much batting of ideas he decided that the best description of what he wanted is to "Take a terminator and inject him with cheese till it's oozing out of everything."

I thought it was an interesting idea, but wasn't intrigued enough to even consider actually trying it. But I was bored one day, saw the pile of extra termi parts from a friend and for some odd reason the description popped into my head again. I sat down, spread out the parts I had on my desk, and took stock. I had enough to assemble a terminator, though the parts were a mix between the Chaos Terminator Lord and either a chaos terminator or a regular terminator, not sure which.

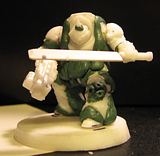
Here's how he looks at the moment. Or not, apparently my most recent pic is between adding the shoulder pads and filling in around them with greensuff >.<

He's still waiting on fine details and some minor touch up. And a real base. There are some additional pictures of this stage at the end of this post.

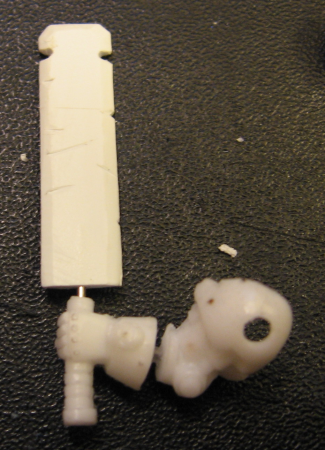
Anyway, to start I took the termi lord legs and carved out the feet so I could reposition him, sadly the feet were mangled coming out so I tossed them in favor of the feet from the standard termi. the crotch and upper legs are also from the same standard termi as the feet. To give the impressing of cheese oozing out of the joints, I carefully seperated the front/back of each part of the legs and glued a wedge shaped piece of plasticard between them to maintain the spacing I wanted.
Photobucket
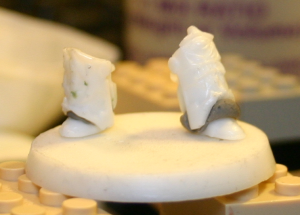
This is actually part of the initial posing of the feet and shins.

Photobucket
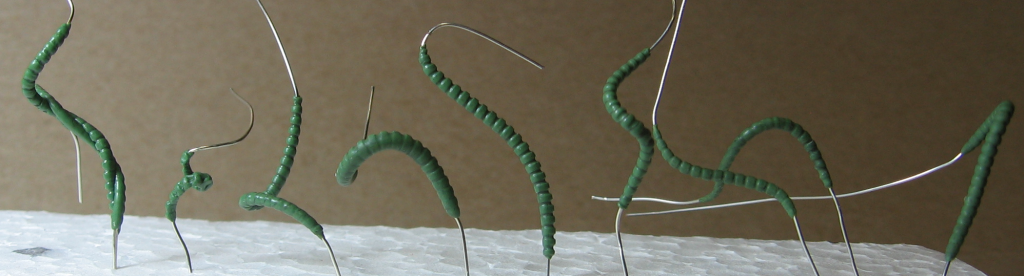
Here the leg's pose is defined and wired together. Paperclips are your friend.

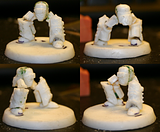
After choosing the pose for the legs and getting them happily in place, I bulked up the cracks with greenstuff teardrops, I did general Google searches on topics related to fat, fat people, rolls of fat, etc to get a feel for how excess flesh hung. And reached this:
Photobucket

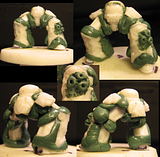
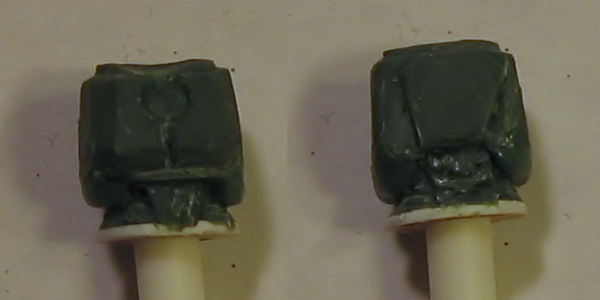
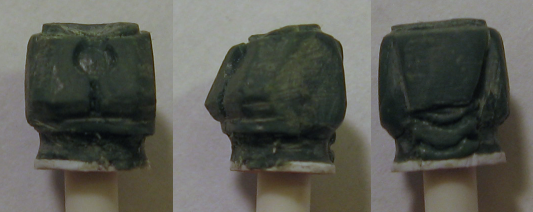
The torso was a bit different as I split it in a number of places regluing the side panels away from the lower torso to allow more fat to seep through.
Photobucket
Yes, those are magnets in his arm sockets, I'll probably remove them as it makes it hard to get the greenstuff to cure in the right place for the rolls of flesh between the arm bits and the body proper.

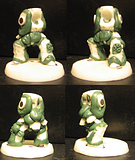
Once i was generally happy with the shape of the torso I moved on to the arms. I spent a lot of time trying to decide which arm bits to use. I ended up using parts from a couple, but equipping him with what is apparently 'standard' equipment. The sword blade is made from plasticard sanded and x-acto knifed down into shape. I chose to mimic the Daemon Prince of Nurgle from the GW site (Chaos Marines -> HQ section).
PhotobucketPhotobucket

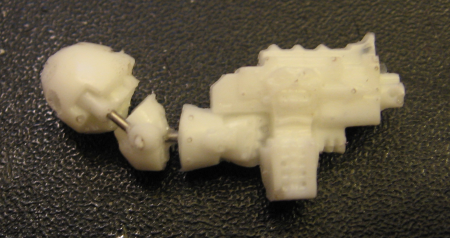
With the arms attached:
Photobucket

Most recently (December?) I added the shoulder pads and finished bulking out the mass there, though as I mentioned above, I seem to have taken the picture between adding the shoulder pads and bulking them up as they're not bulked up in the picture, which is odd as it was all done as the same step in my mind. Also, for those curious, I took his picture with a terminator from the Black Reach set:
Photobucket
Photobucket
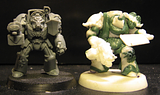
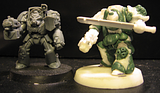
He looks kinda funny without the extra rolls around the shoulder pads. I'll have to take a new picture and post that at some point.

Eventually, I'll add many many pustules and oozing sores to it. Probably.

2010-02-10

Tau character stamps & FW wip

Well, I haven't made much progress on the FW torso, however, I did try to sharpen up the edges and add some of the armour plates on the 'soft' armour front and back... the front didn't work so well, so I pulled it off again. the back needs cleanup, but I'm gonna do that after it's cured some.


I tried a couple different angles to see if that helps show it off.


Also, mimicking an idea a friend of mine did, I've started building tau character stamps.

If you can't tell, they're supposed to be U, 7, 5, and T. Why those particular characters? No idea honestly, they're the ones that came to me when I started work. They'll be used to build the bases my army is going to stand on. (Which is the same thing my friend used his for.) I'll probably sharpen the edges of the characters up with a file and x-acto knife after they're cured.

their use is pretty simple, you get some soft clay, greenstuff, putty, etc and stamp a phrase, quote, or random string of characters into it, let it dry/cure/bake/whatever, then break it into debris to use on a base. It can be left in larger chunks (or whole) for larger bases and/or other terrain.

2010-02-05

Female Fire Warrior torso first sculpt draft

Sorry for the lack of updates, medical issues at home have taken priority. However, earlier today I was able to work on some miniatures. I've gotten the first prototype of the female torso sculpted. It's hard to get smooth and sharp edges done in greenstuff. I tried letting it dry and then grind it down, but that wasn't working so well. I had to re-sculpt it back up again. >.> Maybe I should do it by hand instead of using a power tool ^.~ Anyway, here's how the first trial sculpt looks.
FW-FTorso-wip01
Click on the thumbnail for a larger image.

I poked a bit at the O'larron WIP. Though I think I'm going to pull the head off again and sculpt a smaller one as the 'stock' ones just look huge to me. The arm didn't come out so well either. And as usual, I'm still not sure if this particular model is going to count as a pilot or a 'full suit'.
WIP03
Click on the thumbnail for a larger image.

2010-01-28

Larron Progress

Well, I have at the very least the general shape of the torso ready. I don't plan on having 'great tracks of land' on her so there will probably be minimal (is any) bulking up of her chest, though I do plan on adding details that make it look like she's wearing something ^.~ So far it's been fun learning how to get the green stuff to do even remotely what I want it to with only a piece of wire as structure.
WIP02

Not much to say, progress on her is going slow. Though I do find it kinda interesting that my progress shots mirror Gareth's so closely. I should probably actually sit down and do some doodles to get a feel for how I want her to look.

2010-01-25

Shas'o Daya Larron Amasa

Following in the footsteps of Gareth's Conversion, I've decided to work on my own custom commander. Instead of starting with the O'shaserra legs, I've started with a pair of legs from a basic XV25 suit. (Mainly because they're plastic >.> ) I haven't yet decided if I want to make this model of her an 'ejected pilot' or the actual model (either using O'shaserra's rules or some house rules), so progress has been a bit slow.

In any case, here's a shot of the legs, I've cut out the crotch, repositioned her right knee and both ankles. The next shot should have the first part of the torso done.
WIP01

Sadly it looks better in person then in the picture, I really need to hunt down my mini tripod and re-setup my photo box. >.<