Showing posts with label Obliterator. Show all posts

2011-02-03

Second Obliterator

My second MT post! woo.  It's going to cover the second obliterator for my friend that's actually been sitting here at this point of progress for about two and a half weeks.  Irritatingly after taking the pictures I noticed I didn't have a good picture of the Tau Fusion Blaster mounted in his claw hand, though some WIP pictures of it are in my first Obliterator post.

Morguemeat likes it, so i just need to finish up some of the detail work (like plugs at the ends of some of the cabling) and a few places still need greenstuffing.  In somewhat related thoughts, I think #2501 is right that the first Obliterator's legs need some bulking up.  I'll probably post a group shot once I finish the two of them.

PhotobucketPhotobucketPhotobucketPhotobucketPhotobucket

2010-10-19

First Obliterator

Sadly there hasn't been too much progress on the miniatures front for a while from me.  However, ?I did manage to get quite a bit of work done on the first obliterator.  I like how it turned out for the most part.  the legs need some cleaning up (and probably more wires).  As well as some more flash filing apparently (the things I notice after a photo has been taken).  The conduits are made from florists wire and work amazingly well.  It's not glued to it's base, Morguemeat wants "some kind of industrial stuff, I think" for that, and I'd like to see it at least primed before it's glued down.  And no, there isn't much of an organic marine left as he's been replacing his parts with machinery for who knows how long.


PhotobucketPhotobucketPhotobucketPhotobucketPhotobucketPhotobucketPhotobucket
Click on the thumbnails for larger images.

2010-09-28

Obliterator legs Second Attempt

My second attempt at Obliterator spider legs, these are made from various various random plastic stock i had from other projects.  The pile of copper colored balls are copperhead BBs that are going to act as the hip joint for the new legs.  The joints themselves are 1/8th inch tube with a 1/16" rod running through it's core.  The copperheads are 4.5mm diameter.  Had I been thinking I would have put the terminator torso in the picture for scale.

I'm experimenting with what details to add to the basic frame.  The far left leg has a piston (on both sides, but the second was added after the picture) made from a piece of 1/16" rod and a paperclip.

2010-09-20

Obliterator Cult progress... Or lack thereof


Well, I've learned some important things about my cutter.  Mainly, it can't do sharp corners very well.  It rounds them off.  It's not a big issue with the larger stuff, but with a 5mm x 2mm piece, it's an issue.  I'll still use it to cut out cardstock vehicles and buildings, but it means the detail stuff will have to find another solution.  It also cuts plastic better then cardstock (which isn't so much a complaint as an interesting thought as it was designed for paper cutting).  Though I guess I can't complain too much about a CNC cutter that only cost $400. 

I learned this trying to cut out the obliterator legs I designed a while back.  they came out kinda bloby and misshapen.  (And due to my own stupidity not cut through all the way.)  I'll just have to resort to more classic ways of making them. *sigh*

All in all, I don't suggest the Cricut series to wargaming modelers. I've never used a robocraft, but from some of the cutouts I've seen it's a better choice and you don't have to buy a $50 third party piece of software to make it cut more then the junk images on the cartridges.

2010-08-10

Obliterator Cult progress


Well, I've worked out some designs for the obliterators. Above is one of many doodles on how they'd work. (It happens to be the one I like how looked the best.) I worked up some plans in Inkscape yesterday and I'll have my cutter produce them for me. The idea is the basic parts are cut from 1mm stock and layered together, the individual parts can them be put together, allowing for a full range of posing possibilities.


The red lines are 1mm x 1mm boxes. The outlines on the leftmost are the center, and the other two in each row are glued to either side of the center piece. I'll have to do a few test cuts to see if i like how they're coming out. Then on to real detailing of them.

I've yet to sort out the specifics of how they'll attach to the torsos... the piece in the upper right will likely change when the specifics are worked out.

2010-06-10

Custom Chaos Obliterators

Just recently I've agreed to create 4 Obliterators from a SM Terminator squad and a pile of spare bits.

Fluffwise these Obliterators are relatively recently turned to chaos from Techmarines, so will have minimal 'fleshy parts'. They'll also have helmets looking like the Power Armour MK3 helmets (which are also similar to Grey Knight helmets).

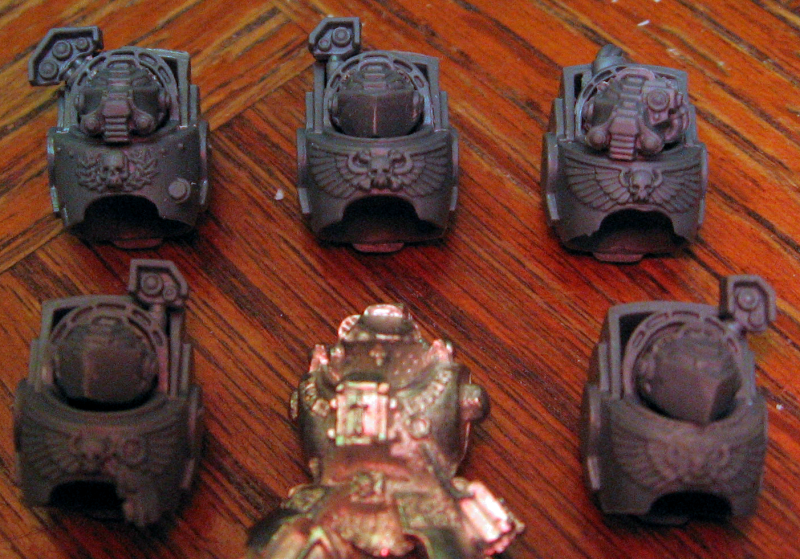
The helmets came out alright so far, I've left a couple unmodified helmets and brought in a metal Grey Knight terminator for comparison purposes.


I've also started work on an arm. It's currently in resin, and hasn't been patched with greenstuff, but it's also coming along alright. I sawed out the lighting claw's palm and glued in a chopped down tau fusion blaster barrel, while extending the top (back?) of the hand with a second lighting claw. The claws themselves ended up backward (they were from a right arm instead of a left), so they were trimmed off then carefully pinned back in place. A second power cable was added as well... just because I thought it looked neat. The shoulder pad is the stock left(?) shoulder pad sanded down with the fuel canister from the fusion blaster used in the claw arm surrounded by grenades from the Khorne Berzerker sprue (I believe). The claw didn't come out quite like the picture in the codex, but I think it looks pretty neat anyway, so will probably leave it and try again for one of the other 3 Obliterators.

I'm not sure what I should do to make them look less like Terminators. I haven't worked much on them yet, so there should be more posts on their progress relatively regularly, along with more work on the modular starship tiles project.