2010-12-09

Modular Starship Progress

Well, I've actually done quite a bit of work on the modular starship sense the last post about it.  I'm up to 8 modules now, 4 of which are room segments (the ones on the far right in the picture).  I have 3 more modules planned out and currntly stored in baggies due to having to clean up my work area for well...  work.  Anyway, the top two room modules are representing some cryostasis room (I had parts and wanted to know how it'd look ^.~ )  the bottom 2 have conveyor belts on them.  They've been a pain as I must be really careful about making sure they line up and go the same direction.  One of the planned modules is a T-intersection with a conveyor belt.  If anyone has good ideas on what types of modules would make a nice diverse starting set, I'm all ears.  So far it seems the T intersections will be outnumbering the others (except maybe room modules, but it requires at least 4 room modules to make a single room.

I need to restart casting of the parts to make the modules as I'm effectively out of floor tiles with the 3 modules in bags.  Hopefully I'll be able to get some made up over the holiday season and have enough to actually play some killzone on by January.

2010-12-06

Iron Corsairs

Almost 2 months sense an update.  I'd protest being busy, but I've just kinda forgot about the blog >.> Anyway, this post is about my space marine chapter.  It had it's name stolen by my new Dark Eldar (of which I have 5 assembled now <.< ), so are now called Iron Corsairs...  which fits better anyway.  I've been thinking about paint schemes for them sense the last killzone game I bat-repped, which has also sadly been my most recent game.

My current working concept is partially thanks to this article by Jeremy Olsen over at Empire of Ghosts.  I've always liked the woodblock style art but hadn't thought of bringing it to the wartable, so I worked up the mockup above to try it out.  I've tried to sculpt up some shoulderpads with the symbol on the door, but haven't had any luck getting even one I like.

Not sure what I think of the blue primary yet.  Probably add a hint more purple to it.  I'll also need a lot of practice painting woodblock cherry blossoms before I put them on an actual tank.

Hopefully I'll be able to get back on the ball and catch up with miniatures stuff for my blog.  I have a couple projects and things to post about that should be of some interest.

2010-10-19

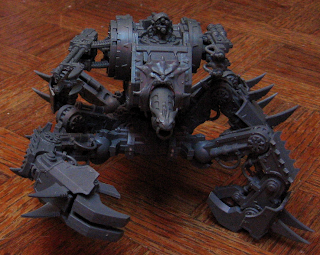
First Obliterator

Sadly there hasn't been too much progress on the miniatures front for a while from me.  However, ?I did manage to get quite a bit of work done on the first obliterator.  I like how it turned out for the most part.  the legs need some cleaning up (and probably more wires).  As well as some more flash filing apparently (the things I notice after a photo has been taken).  The conduits are made from florists wire and work amazingly well.  It's not glued to it's base, Morguemeat wants "some kind of industrial stuff, I think" for that, and I'd like to see it at least primed before it's glued down.  And no, there isn't much of an organic marine left as he's been replacing his parts with machinery for who knows how long.


PhotobucketPhotobucketPhotobucketPhotobucketPhotobucketPhotobucketPhotobucket
Click on the thumbnails for larger images.

2010-09-28

Obliterator legs Second Attempt

My second attempt at Obliterator spider legs, these are made from various various random plastic stock i had from other projects.  The pile of copper colored balls are copperhead BBs that are going to act as the hip joint for the new legs.  The joints themselves are 1/8th inch tube with a 1/16" rod running through it's core.  The copperheads are 4.5mm diameter.  Had I been thinking I would have put the terminator torso in the picture for scale.

I'm experimenting with what details to add to the basic frame.  The far left leg has a piston (on both sides, but the second was added after the picture) made from a piece of 1/16" rod and a paperclip.

2010-09-24

Special Operations: Killzone

Well, a friend of mind and I played a few games of Killzone Thursday evening at the FLGS.  This was mainly as the FLGS had finally finished their expansion adding a tonne of new tables to play on.  A total of 7 games of Killzone were played (before we left, I only participated in 4).  The first two were my Iron Corsairs against Morguemeat's Storm of Sorrow.  (You'll eventually be able to learn more about the Storm of Sorrow Warband here.  Who appears to have posted about his thoughts on the games already.)  Sadly I neglected to bring my camera so was unable to get any photographs of any parts of any of the games.


The list I ended up bringing broke down as follows:

1x Wolf Guard with frostblade, plasma pistol, the 6+ invulnerable save general skill and the 6" FnP leadership skill (I shoulda gone with just a power sword, as I kept forgetting about the +1 S)

1x Wolf Guard with power sword and bolt pistol

1x Wolf Guard with chainsword and bolt pistol (who is now named Firstblood)

1x Long Fang with a Heavy Bolter and Suspensors

3x Grey Hunters with a Melta gun and a Plasma gun


The Sorrow's team was 4 Termis and a mook marine.


All the games played were Mission I.2: Encounter. Mainly for consistency.


The first game Morguemeat chose to go first, the terrain favored me.  I set up my vanguard in a nice piece of cover that they didn't end up leaving.  The rearguard set up the long fang on the third story of a building with good LOS on the field, the plasmagunner in the ground floor doorway of the same building, and the rest of the rearguard roughly behind the vanguard's terrain piece as close as I could get them and I gave morguemeat a sound beating, though firstblood was killed in melee by a chaos terminator.  It wasn't really that interesting of a game and ended on turn 2 or 3...


The second game Morguemeat again chose to go first and again I chose the same table quarter.  This time however, he deployed his forces in a ruin to the one side of the deployment zone.  A much better strategy in my mind.  I deployed my vanguard the same as last time, along with the longfang and plasmagunner, but other 2 rearguard models shifted over to a ruined wall just inside my deployment zone that provided 3 nice firing holes at the other edge of the ruins Morgue had setup in.  His force moved through the main ruin while mine took pot shots through the windows.  His Termi with his big gun (a reaper autocannon I believe it was) got caught in the open by a plasmagun shot on it's way over to join it's teammates in the ruins.  Again on my team Firstblood died first due to his charging terminator again the powersword wolf guard joined the battle and slew the terminator, but I also ended up loosing the melta Grey Hunter, the basic Grey Hunter, and the Long Fang.  My leader did make an epic save vs death sometime in there by actually rolling a 6 on his invulnerable save. ^.^

At this point we took a break and mingled with some of the observers and other players around the area.  This ended up causing our terrain setup to be lost.  So when we re-setup, we ended up with 2 different terrain layouts so we could run 2 games at a time.  Morgue and another Space Puppy player played on the first while I was on the second.

My third game was against an Eldar team, that had a psyker of some sort for the leader, 2 fire dragons (or somesuch) and 2 other sets of 2 models (I can't remember what either of those were called, one set had really mean long range weaponry, and the others died before they did anything). He chose to go first and set up the 2 unknown models and his leader in the vanguard, and the others in the back kinda spread out.  Sadly at this point there was 5 or 6 games running and the terrain ended up being a bit thin.  I positioned my vanguard (all 3 wolf guards, and the melta guy) behind some tank traps with my rearguard clinging to what little cover was available back further.  His first turn had nothing happen...  at all.  Mine put a lot of firepower into his models but did no damage between his invulnerable saves and the FnP AoE on his leader.  His second turn saw his vanguard retreat back toward his table edges and the death of Firstblood.  From there, we basically traded kills model for model (except I got his leader as my 2nd or 3th kill while mine lasted all the way to the last of mine that were killed).  In the end I ended up routing due to rolling a 10 vs Ld of 9 >.>  All in all it was an extremely close game the whole way.

My last game was against the other Space Puppies player and I mopped the floor with him.  I don't remember much about his list other then it had a Terminator with Wolfclaws in it.  I switched tables so was against someone already familiar with the terrain... though he chose to go first and I ended up with a reasonably nice quarter.  I set up my vanguard behind yet more tank traps (why there were so many tank traps in the middle of both tables I dunno).  with the rearguard kinda haphazard in the back where they had good lanes of fire. His first turn involved his vanguard missing my two models in range with his pistols and his rear guard moving up.  My first turn involved killing his leader.  A plasma shot from my leader took out his first wound, the power sword wolf guard missed with his bolt pistol, and the long fang splattered him with three 6s to hit, and two 6s and a 5 to wound.  He rolled a 1 and and two 2s for armour and died.  His second turn had his termi assault Firstblood, with my power weapon wolf guard reactive assaulting to join the battle.  The Termi rolled bad but still killed off Firstblood, but Firstblood and his companion in some amazing luck put 5 wounds on the Terminator (3 of which were power weapon).  The terminator failed 4 of the 5 and went squish into mush.  My last turn had my models move up, shoot the death all but one of his remaining troops (I think there were 4), and the last died to an assault.  Ending the game with a complete tabling.  The dice gods were not with my opponent's puppies.

The 7th game of Killzone for the day was the other Space Puppies vs the Eldar group.  I didn't see how that one ended, but the Space Puppy termi was the first model to die and didn't get to do anything.  Morgue and I headed out after I purchased some a new tube set of greenstuff.

All in all, I like the Killzone format, and really can't wait to see what the team is cooking up for the campaign side.  It was hard to set up a force in only 200 points with 25 points of skills.  I'm thinking I might suggest our group relaxes that to 30 so we can have 3 specialists instead of just 2 and a generalist.  Some of my earlier lists suffered from the 40k unit norm of equipping everyone the same.  But after seeing some of the lists posted by the killzone team, I rebuilt and feel my list is much more interesting.  I did find it funny that in just those 4 games some of my team started building up some flavor and fluff.  Firstblood taking the first face full of dirt in each game, the wolfguard with powersword rushing into whatever close combat was nearby and earning the title Terminator Slayer for having taken one down in each battle he participated in (that had one).  Now I just need to choose a paint scheme and get my Spec Ops team painted.

2010-09-20

Obliterator Cult progress... Or lack thereof


Well, I've learned some important things about my cutter.  Mainly, it can't do sharp corners very well.  It rounds them off.  It's not a big issue with the larger stuff, but with a 5mm x 2mm piece, it's an issue.  I'll still use it to cut out cardstock vehicles and buildings, but it means the detail stuff will have to find another solution.  It also cuts plastic better then cardstock (which isn't so much a complaint as an interesting thought as it was designed for paper cutting).  Though I guess I can't complain too much about a CNC cutter that only cost $400. 

I learned this trying to cut out the obliterator legs I designed a while back.  they came out kinda bloby and misshapen.  (And due to my own stupidity not cut through all the way.)  I'll just have to resort to more classic ways of making them. *sigh*

All in all, I don't suggest the Cricut series to wargaming modelers. I've never used a robocraft, but from some of the cutouts I've seen it's a better choice and you don't have to buy a $50 third party piece of software to make it cut more then the junk images on the cartridges.

2010-09-18

Ze vinn'r iz...

Sorry for the 6 hour delay in announcing the winner, but I forgot to before heading over to my weekly (computer & RP) gaming group.

Anyway, SC John from Santa Cruz wins this.  I'm strongly in support of the model not becoming terrain, sorry TBkoot.  John, Shoot an email to oniakki (at) gmail with your address and I'll get your new commander shipped out to ya.

2010-09-17

Robed Space Puppies

I'd never really looked into the Space Wolves codex as I actually disliked how the models looked and what I knew of the fluff.  But having delved a bit deeper into the custom chapter using whichever manual works best to represent them, I've found the space puppies are actually a really nice manual to work out of.  A few of the special options need to either be ignored or renamed, but ignoring that, it has a number of very dynamic and customizable unit selections.  I was planning on using the Blood Angels codex for my Spectres, but I may just end up with counts-as Space Puppies in robes. ^.~

Anyway, The main reason I started looking into it is due the Big Jim's Killzone rules over at Galaxy in Flames.  Combined with the Dark Angels Sprues I won from the SBCGA it provided me a way to start playing with a small force and work up.

My current (as of yet untested) 250 point force consists of:
Wolf Guard (Flagged as Leader)
6" FnP LS, plasma pistol, and frost blade

Wolf Guard with plasma pistol and power weapon
Wolf Guard with plasma pistol and Close Combat Weapon
4 Grey Hunters with 3 meltaguns

Lone Wolf with twin-linked Plasma Pistols.  (Because for some reason adding more plasma reactors makes the weapon safer! >.> )

I'm not sure the Plasma Pistols should actually count as twin-linked, but my opponent thinks they should be, so I'm going with it.  Mainly as the model looks pretty neat dual wielding plasma pistols.  I need to pick up a box of something to get needed bolt pistol arms and CCW arms.  Having looked over the kits, I can't decide if I'd rather go with a Khorne Berzerker box or a Space Wolfs Pack box.  I'd get the most arms from the zerker set, but I think I'll probably find more uses for the 'extras' from the Space Wolves box.

Image came from here.

2010-09-15

SBCGA Reminder

I've received my Dark Angels Upgrade prize from JRV at Okidus, so I figured it'd be a good excuse to remind everyone that my own SBCGA is still running here.  It finishes this Friday.

2010-09-14

Genestealers missing arms

Yay, last week spent pulling hair getting ready for anime convention, last weekend spending far too much time awake at convention, Monday sleeping it off and now back to (hopefully) workin' on some 40k.

I'm sure a number of other people have noticed this, but 2 of the Space Hulk Genestealer sculpts are missing an arm.  This isn't a case of broken off arm, they were never sculpted in.  Initially I thought 3 were, but I found the missing arm on the one emerging from the floor.

I'm not sure what (if anything) I want to do about this.  It shouldn't be too hard to add an extra arm back into the 'stealers.  Though I'm wondering if I'll have the right kinds spare to use for them from the other 'stealers I have.

2010-09-09

A Generous Gentleman

Recently b.smoove over at A Gentleman's Ones had a design contest for the masthead of his blog. Sadly I didn't even make the finalists list, but that's ok, I had fun.


I focused on making the header match the description of what a Gentleman's Ones is (based on the description provided in his blog's sidebar).  And came up with a last stand (which many seemed to have done).  And I made a slight change to the subtext message to make it flow better.  Incidentally, there is actually only 20 unique gaunts in the image, and a single warrior.  I'm missing a chunk of my 'nid army so I used what was available (and painted).  The 2 marines consist of my entire collection of painted marines (which I didn't even paint), though I plan on rectifying that in the next few months as my Dancing Spectres take on a more definitive form.

Anyway, I entered the contest for the fun of making a new banner.  I was expecting a single model of some type as the everyone gets a prize bit.  Man was I surprized.  I now have 22 Space Hulk Genestealers and 20 door frame bases.  Oh and a sweet T-shirt.


Thanks B. Smoove, these look like they'll be great fun to paint as they have nice dynamic poses, and is a more then generous prize. ^.^

2010-09-03

Super Blog Chain Giveaway!

Having won a couple of Dark Angels Sprues in JRV's giveaway at Okidus, I'm offering up my own Super Blog Chain Give Away.

For mine I have a nice unassembled XV89 crisis suit up for grabs.

Interested in a chance to win stuff?
To Participate:
1) You must have a blog
2) You must have something worthwhile to offer up to give away for free.
3) If you win, you must hold your own blogsite give away using the same rules to pay it forward. You must contact me and Santa Cruz Warhammer with a link to your give away so we can send bloggers to your site.
4) You may only enter once per give away. If you enter twice, only your first entry will be considered.
To Enter:
1) Be a follower of this blog (I do update, honest I do! :p  )

2) Leave a comment to this post with the following information:
--Why you want or need the prize.
--What you will give away on your blog to pay it forward.
--Where your blog is.

The Prize:

Well, when I went to take pictures of the parts, I noticed I have a R'myr chest plate even though I only have 1 R'myr and it's assembled and painted (with the right chest plate).  So I went through my stuff and found a cast 'regular' torso that was for my Tauchicoma project that I'll include as well.  It's cast in a almost translucent white resin that anyone who's followed my blog knows doesn't photograph well.  Sorry the suit isn't on sprues, but i have a bad habit of removing the sprues to store the parts in compartmentalized bins.
Winner Selection:
The winner will be chosen by me based on the reason for wanting the suit and your blog.  Not to say new blogs won't win (I'm a relatively new blog myself, and I'm not saying what about the blogs I'm looking at/for ^.~ ) but I like looking at blogs.

The winner will be chosen Friday the 17th of September (two weeks from today).

2010-08-29

Modular Starship Tiles - Progress

I've been busy casting from my molds, so I have 3 modules in a playable state, they still need the outside tiles on the walls (mainly for support and so i don't have to look at the scraped plaster side of the tiles...) and a base of some sort.

I've found that mixing in a few drops of black paint to the plaster while I'm mixing it gives the tiles a gray tint which should help to disguise any chips the tiles end up earning in the course of playtime.  My test batch was was too dark (the one really dark gray piece in the corner tile above), and the second was just a hair too pale (the access hatch in the corner above).  The specific ratio I use isn't of much use to anyone else as it's 8 drops paint, to enough water to fill the cup to the 3rd from bottom ridge, with enough hydrocal that it stops having water floating on top.  Which basically fills the cup with plaster.

PhotobucketPhotobucket
The three play-able modules beside one busy drying.  The figures are more a time waster while I'm waiting for plaster to cure and modules under assembly to dry.  I've found I dislike the 2 molds that have just the one piece of the wall in them (of which I'm currently using to hold the plastic sheet on the table down...) due to them requiring a lot more sanding then I expected.  The molds aren't all filled as I was lazy for this one and didn't mix a second cup worth of plaster to finish filling them up (and I was helping family use my cutter to make some stencils for some girl scout project of some sort).  The black box with red drawers in the one image is where the fully dry pieces go for storage until I need them for the tile(s) I'm currently assembling. 

Overall, the pieces take an hour to cure enough to de-mold them then about 24 hours drying time before they're ready to be glued together.  So they live on a tray where I slide them down as molds cure and pieces dry.  I don't cast nearly as many as I could be in a day, but I have been casting about a tile and a half to two tiles worth of pieces a day, which should give me enough parts to build my minimal 3' x 3' table in just over 2 weeks.  Maybe I should try stepping up production speeds. >.<

Photobucket
There are about one and a half molds worth of parts on this tray busy drying.

2010-08-18

Modular Starship Tiles - More Molds

I did some work on the modular starship over the last couple days, including production of 3 more molds. I should start Hydrocal casting of the molds I have next time I want to work on this project and should have a number of actual pieces assembled.


For this step, I made molds for the actual corners of the corner tiles. Above you can see a mock up made from pieces I had lying around as well as the pieces I actually cast the mold from. I threw some ultra wombles in for scale purposes.

Photobucket
The first of the newest molds, this one is for the both inner corners and customized straights. The somewhat complicated end 'caps' for the pieces were assembled and then cast so they'll be single pieces and less prone to joint breakage.

Photobucket Photobucket
The above mold used along with the basic decking pieces. The second image is using the pieces cast from the extra space on the outer corner, shown next.

Photobucket
The outer corner actually gave me a tonne of issues as apparently Hirst wasn't expecting me to use some of the blocks the way I did... in any case, I finally worked out something that looks reasonably good. This mold also has the upper part of the door frame on it (the really long piece along the top edge of the mold). that will hold the large bulkhead doors in place. I had a bulkhead door mostly ready for casting a while back but it's disappeared and I haven't been willing to fight with a new one as of yet.

Photobucket
Just the outer corner pieces. i need to clean up and cast from the molds so i can glue one together for the pictures instead of just piling the parts together.

Photobucket
This is just a cast of the wall panels and the bottom edge trim again. I made it as I need so many more of them then any other piece that came with them, I recast those parts.

Photobucket Photobucket
Last some physical mockups of a straight section with some ultra wombles for scale. Final pieces will be mounted on something (probably 1/4" cork, but not positive) and will actually have the second 1/4" walls on the outside for structural support.

2010-08-10

Obliterator Cult progress


Well, I've worked out some designs for the obliterators. Above is one of many doodles on how they'd work. (It happens to be the one I like how looked the best.) I worked up some plans in Inkscape yesterday and I'll have my cutter produce them for me. The idea is the basic parts are cut from 1mm stock and layered together, the individual parts can them be put together, allowing for a full range of posing possibilities.


The red lines are 1mm x 1mm boxes. The outlines on the leftmost are the center, and the other two in each row are glued to either side of the center piece. I'll have to do a few test cuts to see if i like how they're coming out. Then on to real detailing of them.

I've yet to sort out the specifics of how they'll attach to the torsos... the piece in the upper right will likely change when the specifics are worked out.

2010-07-28

High Humidity Priming


The Night Goblins have a new green skin companion!

Anyway,

Maybe it's just something from coming from a place where high humidity is 30% to someplace where the lowest is 30%-35%, but I can't get anything to prime right. So I still have a mostly unprimed goblin army. Which sadly will probably stay as such so I'll likely not get much (if any) mini painting done these next couple weeks. ><

2010-07-26

Night Goblins


Well, I'm in Kansas for the next 3 weeks, so don't have my normal minis or supplies to work on. (Yes, I should've been smart and packed some up to take.) However, I found I have most of the Night Goblins from the 7th ed battleforce. I have the rest of the archers but they're at home on my shelf. I also have 7 of the original 10 spiders.

I mention these as I think I'll probably be painting these over the next couple weeks during down times when I have the time.

2010-07-22

Crisis suits


I have done some painting / construction on my crisis suits so I have basecoats on four more suits. I apologize for the low quality of a couple of the images, not sure why they're acting up. I'll try to get some better pictures tomorrow in the daylight.

I fails at the bloggosphere thing! I just noticed it's been over a month sense I posted anything here. Sadly it's a 2 fold problem. Firstly I haven't done much in the way of miniatures... Secondly I've been too lazy to post anything or take pictures.

This is the best picture of the crisis suits, and the suit is kneeling to take aim (I thought it was a good use of the nice rotatable ForgeWorld legs).


This is one I assembled earlier, not sure what it's up to... Looks kinda confused.


This one is so going to end up with a broken foot, he's my first attempt at a running pose, and as such there is only one foot in contact with the base... Kinda scary. this one hasn't had the OSH hand mod done as it had it's fingers retracted for running.


This one I like. Having just mashed a plague marine (visible on her base), she's beckoning toward her next target.


None of these crisis suits are glued to their final bases yet, as a few still need them painted, and they're not finished being painted themselves.

And last but not least the Newest Devilfish! (Well, maybe, it is only a devilfish compared to crisis suits, but eh)

2010-06-10

Custom Chaos Obliterators

Just recently I've agreed to create 4 Obliterators from a SM Terminator squad and a pile of spare bits.

Fluffwise these Obliterators are relatively recently turned to chaos from Techmarines, so will have minimal 'fleshy parts'. They'll also have helmets looking like the Power Armour MK3 helmets (which are also similar to Grey Knight helmets).

The helmets came out alright so far, I've left a couple unmodified helmets and brought in a metal Grey Knight terminator for comparison purposes.


I've also started work on an arm. It's currently in resin, and hasn't been patched with greenstuff, but it's also coming along alright. I sawed out the lighting claw's palm and glued in a chopped down tau fusion blaster barrel, while extending the top (back?) of the hand with a second lighting claw. The claws themselves ended up backward (they were from a right arm instead of a left), so they were trimmed off then carefully pinned back in place. A second power cable was added as well... just because I thought it looked neat. The shoulder pad is the stock left(?) shoulder pad sanded down with the fuel canister from the fusion blaster used in the claw arm surrounded by grenades from the Khorne Berzerker sprue (I believe). The claw didn't come out quite like the picture in the codex, but I think it looks pretty neat anyway, so will probably leave it and try again for one of the other 3 Obliterators.

I'm not sure what I should do to make them look less like Terminators. I haven't worked much on them yet, so there should be more posts on their progress relatively regularly, along with more work on the modular starship tiles project.

2010-06-04

Magnetized Defiler


Well, I haven't posted here much, but sadly that's mainly due to not much wargaming stuff happening with me. I have however magnetized a Defiler for a friend, so I have some pictures.