Showing posts with label Conversion. Show all posts

2012-12-27

Tentacoos and more Tentacoos

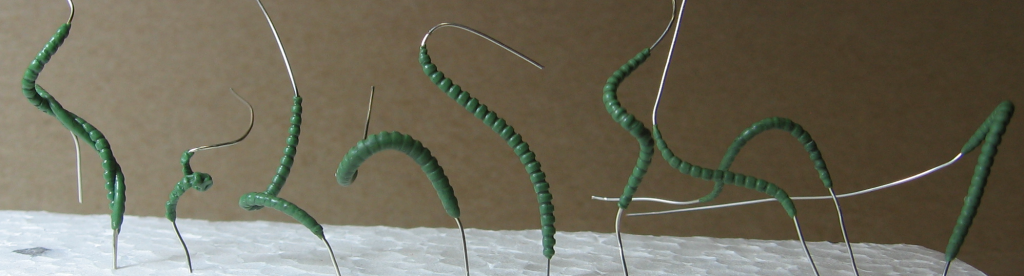
After seeing 40kaddict's article on a cheap and quick alternative for the tentacle maker I couldn't help but make some myself for my Slaanesh daemon princess.  I've run two batches so far, and tried a preliminary tentacle ball beast weapon thing on the daemon princess herself.


Above is the first batch of tentacles, and most of them ended up rather thick.  So I worked out a second set (below) after the first had cured. Which turned out better, I tried twisting a couple together in this batch trying to figure out how to pose the tentacles while the greenstuff is still uncured.  I'm sure a few cycles down the road I'll actually start being happy with them.


I have a couple Slaanesh project ideas currently, to use tentacles in, so i figure many will get used anyway.  I'll probably end up placing these and making more to mount while still uncured to make them look like they fit better together.

2011-07-14

Tauchikoma Broadside


She is pieced together from both a regular XV8 Crisis Suit and a Forgeworld XV88-2.  I liked how the Forgeworld Broadside weapons look, and after inadvertently learning they could be easily mounted on the backpack mounts of a normal suit (the connector bar for the arm slots right into the backpack groove), I couldn't get the image of the broadside Tauchikoma out of my head.

PhotobucketI started with the normal tauchikoma body and trimmed down the FW Broadside 'heatsinks' to glue to the normal backpack's jetpack arms, trimming down some of the nozzles.  The space between the jetpack and heatsinks was filled with greenstuff.  I left the bottom-most nozzle open, figuring it might be fired when the railguns fire to help stabilize.

I had to ponder for a while to place the second array of missiles, the first set was obvious in the space the normal tauchikoma carry their primary weapon system.  I ended up attaching them to the 'screw' nubs on either side of the backpack where I suppose normal tauchikoma would have line launchers like in GitS.  This should allow the existing line launcher power and control interface to fire off missiles without having to run any new control circuitry.

PhotobucketLooking over the pictures, there are resin bubbles in the railgun muzzle vent things.  Those are going to be a pain to clean out >.<

As an interesting aside, I went hunting for the tau'chi'koma that were my inspiration, and while I believe I found the thread they were in; all the images have been removed.  I recall there being a broadside or 2 in that set, but can't verify it or compare the 2 units.  ;.;

Edit: Hahaha!  Thanks #2501 for reminding me that you were the one!  Here's his Tau'chikomas.  Though this does lead me to wonder what the thread I found was...  It's here by the way.  Anyway his broadsides are quite a bit different then mine, but that's ideal.  And my second one will look different from either as I don't have any more spare FW Broadside torsos (which is odd as I have another set of railguns >.> ). 

 Photobucket

2011-06-16

El'larrun Special Character

Whee, assembly done.  Not super happy with it, but that's just my skill not reaching up to where my wants/desires lie.  I started with a stealth suit and cut it into many, many pieces.  Some of you might recognize the legs from the old O'larron sculpt which was cannibalized for this.  The rail rifle she has equipped came from a Sniper Drone (I believe, not positive). Her head is a daemonette head from the new plastic range, sadly her nose is crooked.

She's going to be painted green to match the rest of my army, though I think I'll try the partially disengaged stealthfield effect for her.

2011-06-09

Tau Robots


While waiting for greenstuff on my entry for the Character Competition to cure, I built this little guy from a memory.  Sadly I don't have any Necron Warrior arms with which to complete it. (I have 7 other sets of Warrior Legs, and 16?  scarabs, but no arms ;.;  Imagine the back half of the basic Gauss Flayer and the long barrel of the Tau Rifle, maybe with some odds and ends to bulk it out.

I should have a couple posts up in the following weeks for the CC entry, and sorry for neglecting to post, was dealing with a Great Grandfather's passing, so got practically nothing done the last couple weeks.

2011-05-12

Noise Marine Progress

Also during this last month I managed to progress some on my Noise Marine.  The guitar, and the two arms aren't glued down, though the greenstuff might have forced her(its?) right arm to be still.  I still need to finish the guitar itself and adjust the left hand to be gripping the guitar neck.  I really wanted a different right arm, but after a week of hunting didn't find any suitable and I lack the skills to sculpt a pointing right hand.  Originally I wanted the guitar held in her left hand by its neck, right where the neck comes out of the body (maybe the body resting on the knee guard) and the right hand pointing out at the fans like rock stars sometimes do (at least what little of rock stars I've seen.) 

PhotobucketPhotobucketPhotobucketPhotobucket

2011-03-31

Noise Marine WIP

Well, I've made some progress on my new Noise Marine that's going to be assisting my Chaos Cult in Inquisimunda.  The guitar has been fun to build so far, but I'm not sure what to do to provide strings for it.  I'm gonna have to greenstuff on some knobs (or find some 1/32nd inch plastic rod).  She'll be holding her guitar by the neck in her left arm.  I was kinda hoping for a pointing right arm (the only one I've been able to find is also a powerfist, so fail there).  but at the moment it looks like I'll be modifying a plasma pistol to be a Sonic Blaster.  Her right leg ended up being pinned on a bit low so I'll be trying to shift it up a little bit as well as continuing to greenstuff details and fill gaps.  The helmet will receive a band over the top so the horn mounts over the ears will look like massive headphones.  Not positive where I'm going to put the helmet as she's going to be bare headed.
Here's the parts as they stand so far.  A friend suggested that they look like they're on display to warn away people.

2011-03-25

New Concept

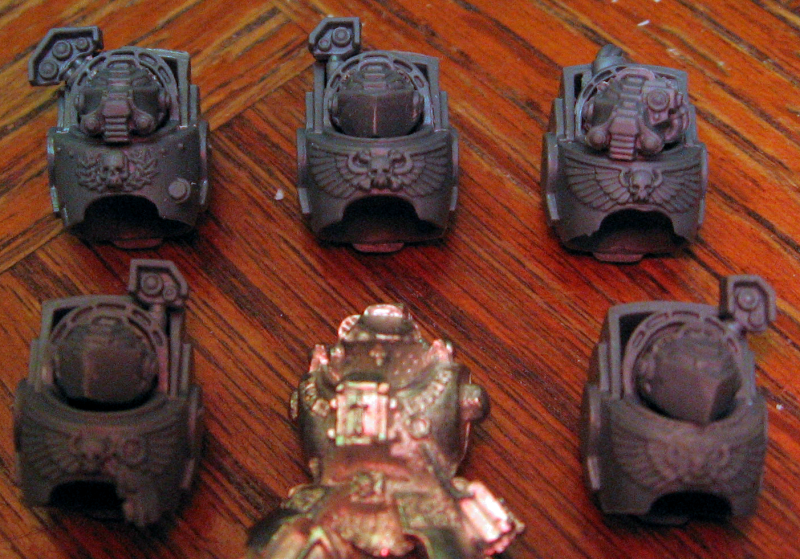
As absolutely nothing has been happening miniature related (other then the reading of blogs, which is boring to blog about), i haven't been posting.  However, last night a new concept hit me while looking through my bits in preparation to start packing them up (I haven't done a clean up cycle for miniature stuff in ages).  I took a picture of the bits I'd pulled out for the project, and i think i'll probably be using parts from every bit in the picture (except one of the shoulder pads, not sure how I ended up with 3 there).  There will also be a fair bit of plasticard, wire, and greenstuff involved (but that's pretty standard for conversions, no?


The only other hint I'm giving is that it's for my Inquisimunda force, but can be used in normal 40k as well (though when complete, I'll have a whole 2? models for that army ^^;  )  Hopefully I'll have the first shots of actual progress on it sometime next week, I doubt I'll make much progress over the weekend (as that's dedicated to friends and video/card games instead of miniatures, of which I'm like one of 3 or 4 people in my social group that actually have any interest in miniatures)

2011-02-07

Land Raider Crusader

I picked this guy up along with 2 techmarines and a servitor at a swap meet for $35 a while back.  I wish I'd thought to take some pictures of it before I started repairing it.  It's one of the older plastic + metal models.  After extensive green stuff work and replacement of the treads I gave it a quick basecoat to try out my blue and gray Space Marine scheme.  Sadly these are the best pictures I managed to take, and it leaves the blue and grey a lot lighter then it actually is and doesn't show the sparkle of the gunmetal paint >.<  Not sure having a dedicated photo box would help that any though.

PhotobucketPhotobucket

2011-02-03

Second Obliterator

My second MT post! woo.  It's going to cover the second obliterator for my friend that's actually been sitting here at this point of progress for about two and a half weeks.  Irritatingly after taking the pictures I noticed I didn't have a good picture of the Tau Fusion Blaster mounted in his claw hand, though some WIP pictures of it are in my first Obliterator post.

Morguemeat likes it, so i just need to finish up some of the detail work (like plugs at the ends of some of the cabling) and a few places still need greenstuffing.  In somewhat related thoughts, I think #2501 is right that the first Obliterator's legs need some bulking up.  I'll probably post a group shot once I finish the two of them.

PhotobucketPhotobucketPhotobucketPhotobucketPhotobucket

2010-10-19

First Obliterator

Sadly there hasn't been too much progress on the miniatures front for a while from me.  However, ?I did manage to get quite a bit of work done on the first obliterator.  I like how it turned out for the most part.  the legs need some cleaning up (and probably more wires).  As well as some more flash filing apparently (the things I notice after a photo has been taken).  The conduits are made from florists wire and work amazingly well.  It's not glued to it's base, Morguemeat wants "some kind of industrial stuff, I think" for that, and I'd like to see it at least primed before it's glued down.  And no, there isn't much of an organic marine left as he's been replacing his parts with machinery for who knows how long.


PhotobucketPhotobucketPhotobucketPhotobucketPhotobucketPhotobucketPhotobucket
Click on the thumbnails for larger images.

2010-09-28

Obliterator legs Second Attempt

My second attempt at Obliterator spider legs, these are made from various various random plastic stock i had from other projects.  The pile of copper colored balls are copperhead BBs that are going to act as the hip joint for the new legs.  The joints themselves are 1/8th inch tube with a 1/16" rod running through it's core.  The copperheads are 4.5mm diameter.  Had I been thinking I would have put the terminator torso in the picture for scale.

I'm experimenting with what details to add to the basic frame.  The far left leg has a piston (on both sides, but the second was added after the picture) made from a piece of 1/16" rod and a paperclip.

2010-09-20

Obliterator Cult progress... Or lack thereof


Well, I've learned some important things about my cutter.  Mainly, it can't do sharp corners very well.  It rounds them off.  It's not a big issue with the larger stuff, but with a 5mm x 2mm piece, it's an issue.  I'll still use it to cut out cardstock vehicles and buildings, but it means the detail stuff will have to find another solution.  It also cuts plastic better then cardstock (which isn't so much a complaint as an interesting thought as it was designed for paper cutting).  Though I guess I can't complain too much about a CNC cutter that only cost $400. 

I learned this trying to cut out the obliterator legs I designed a while back.  they came out kinda bloby and misshapen.  (And due to my own stupidity not cut through all the way.)  I'll just have to resort to more classic ways of making them. *sigh*

All in all, I don't suggest the Cricut series to wargaming modelers. I've never used a robocraft, but from some of the cutouts I've seen it's a better choice and you don't have to buy a $50 third party piece of software to make it cut more then the junk images on the cartridges.

2010-08-10

Obliterator Cult progress


Well, I've worked out some designs for the obliterators. Above is one of many doodles on how they'd work. (It happens to be the one I like how looked the best.) I worked up some plans in Inkscape yesterday and I'll have my cutter produce them for me. The idea is the basic parts are cut from 1mm stock and layered together, the individual parts can them be put together, allowing for a full range of posing possibilities.


The red lines are 1mm x 1mm boxes. The outlines on the leftmost are the center, and the other two in each row are glued to either side of the center piece. I'll have to do a few test cuts to see if i like how they're coming out. Then on to real detailing of them.

I've yet to sort out the specifics of how they'll attach to the torsos... the piece in the upper right will likely change when the specifics are worked out.

2010-06-10

Custom Chaos Obliterators

Just recently I've agreed to create 4 Obliterators from a SM Terminator squad and a pile of spare bits.

Fluffwise these Obliterators are relatively recently turned to chaos from Techmarines, so will have minimal 'fleshy parts'. They'll also have helmets looking like the Power Armour MK3 helmets (which are also similar to Grey Knight helmets).

The helmets came out alright so far, I've left a couple unmodified helmets and brought in a metal Grey Knight terminator for comparison purposes.


I've also started work on an arm. It's currently in resin, and hasn't been patched with greenstuff, but it's also coming along alright. I sawed out the lighting claw's palm and glued in a chopped down tau fusion blaster barrel, while extending the top (back?) of the hand with a second lighting claw. The claws themselves ended up backward (they were from a right arm instead of a left), so they were trimmed off then carefully pinned back in place. A second power cable was added as well... just because I thought it looked neat. The shoulder pad is the stock left(?) shoulder pad sanded down with the fuel canister from the fusion blaster used in the claw arm surrounded by grenades from the Khorne Berzerker sprue (I believe). The claw didn't come out quite like the picture in the codex, but I think it looks pretty neat anyway, so will probably leave it and try again for one of the other 3 Obliterators.

I'm not sure what I should do to make them look less like Terminators. I haven't worked much on them yet, so there should be more posts on their progress relatively regularly, along with more work on the modular starship tiles project.

2010-05-02

Tau-chikoma


After seeing the tau-chikoma over at Musings of a Metal Mind I just knew I had to make at least one of my own. So instead of painting last Tuesday like I planned, I built a tau-chikoma. And I'm not sure why it's taken me so long to get it posted here >.> Sadly it's not because I've been doing other miniatures related things. ;.;

The assembly is actually a lot more straight forward then I thought at first. Though I neglected to take pictures of the stages. Initially I was trying to attach the 'front' torso to the back torso first. This was horribly hard. So I gave up on that and attached the back legs first. They should be attached so the curvy part (usually toward the crotch of the suit) goes forward with the armour on top. I played with the legs a bit in both arrangements and found that the space forward gives the better range of motion.

After the back legs are on the front torso slides right into place with little trouble. One thing I do suggest is to cut off the stock shoulder ball joints before gluing the torsos together. I also drilled into the spaces the joints were so the front legs sunk in a little and looked better. On the next one I'll probably drill/carve them out more.

After attaching the front legs, I made my big oops. Wanting to make it so I could swap out the nose weapon on the model and to reinforce the torso to torso joint (which for me wasn't as sturdy as I'd have liked), I decided it was a good idea to fill in the space in the torsos with resin. This in and of itself was a fine idea... however, I neglected to take the proper precautions so the model wouldn't fall over while the resin was curing, so I made a bit of a mess. Luckily I was able to peel/scrape off most of the spilled resin, so the model doesn't look like a blob. I did loose a lot of the detail on one of the rear legs, but it's in a mostly hidden place, so I'm not too worried.

The final piece was the head/face. It'd made from a trimmed thinner Stealth suit optics and a piece of standard house power wire that I had sitting around.


I think next time I'm going to trim the overhangs of the front torso a bit so it can sit lower on the model. This second image is actually the first I took, but as is normal for the white resin, I couldn't pick out details and took it before I found the housing wire, so I gave it a quick green brushing (which isn't done too well, but eh), which is the first image of the blog.

2010-04-07

Female Fire Warrior First Assembly


My female Fire Warrior torso next to a stock torso. Apparently I've decided female Tau are taller and narrower then male Tau. I gave the female torso a quick wash so it would show up in the camera. Looks like I caught an air bubble in the belt buckle >.<

I had suspected that making the torso narrower would have issues. Not that I don't have issues anyway connecting Firewarrior arms to normal torsos. I should ask OSH's help desk if there is a trick to it >.>

Photobucket
The glue holding her off arm looks odd as I dropped her into my water cup on accident while it was drying, causing the superglue to react oddly. Oh well, it'll need some clean up.

Photobucket
And next to one of my painted FWs. I'll have to paint her up for a better comparison ^.^

However, all in all, I like how the female torso came out this time around. I neglected to get any pictures of the process I went through to cast the torso, so that'll have to wait.

Random thought: Has anyone else noticed that the citadel washes have a sweet taste to them?

2010-02-22

Female Fire Warrior Torso progress


Sense my last update, I've ground down the stomach area all around, slimming her a lot and added the little flange things on the sides of the armour. This step was a lot easier then I thought it'd be. I decided I really didn't like the first run of the articulated panels on the back of the 'soft' area, so removed it before the stomach slimming. Afterward, I added them back in. I really like how the back one came out, even if it did end up crooked. >.<

I neglected to remember to put the lines in the front articulated section, so I'll try carving them into it. Failing that I'll pull it off and try again.

Overall I think it's coming along nicely. Hopefully I'll find a place to do some base casting to finish up my first set of fire warriors, they're getting antsy for their new bases.

2010-02-11

Nurgle Terminator

This isn't actually a new project, I've been working on it off and on sense around August 2009, but I noticed it sitting there and thought I'd post about it. I don't play Chaos myself, but my gaming group was discussing ideas a long time ago and our resident minion of Nurgle wanted themed terminators. After much batting of ideas he decided that the best description of what he wanted is to "Take a terminator and inject him with cheese till it's oozing out of everything."

I thought it was an interesting idea, but wasn't intrigued enough to even consider actually trying it. But I was bored one day, saw the pile of extra termi parts from a friend and for some odd reason the description popped into my head again. I sat down, spread out the parts I had on my desk, and took stock. I had enough to assemble a terminator, though the parts were a mix between the Chaos Terminator Lord and either a chaos terminator or a regular terminator, not sure which.

Here's how he looks at the moment. Or not, apparently my most recent pic is between adding the shoulder pads and filling in around them with greensuff >.<

He's still waiting on fine details and some minor touch up. And a real base. There are some additional pictures of this stage at the end of this post.

Anyway, to start I took the termi lord legs and carved out the feet so I could reposition him, sadly the feet were mangled coming out so I tossed them in favor of the feet from the standard termi. the crotch and upper legs are also from the same standard termi as the feet. To give the impressing of cheese oozing out of the joints, I carefully seperated the front/back of each part of the legs and glued a wedge shaped piece of plasticard between them to maintain the spacing I wanted.
Photobucket
This is actually part of the initial posing of the feet and shins.

Photobucket
Here the leg's pose is defined and wired together. Paperclips are your friend.

After choosing the pose for the legs and getting them happily in place, I bulked up the cracks with greenstuff teardrops, I did general Google searches on topics related to fat, fat people, rolls of fat, etc to get a feel for how excess flesh hung. And reached this:
Photobucket

The torso was a bit different as I split it in a number of places regluing the side panels away from the lower torso to allow more fat to seep through.
Photobucket
Yes, those are magnets in his arm sockets, I'll probably remove them as it makes it hard to get the greenstuff to cure in the right place for the rolls of flesh between the arm bits and the body proper.

Once i was generally happy with the shape of the torso I moved on to the arms. I spent a lot of time trying to decide which arm bits to use. I ended up using parts from a couple, but equipping him with what is apparently 'standard' equipment. The sword blade is made from plasticard sanded and x-acto knifed down into shape. I chose to mimic the Daemon Prince of Nurgle from the GW site (Chaos Marines -> HQ section).
PhotobucketPhotobucket

With the arms attached:
Photobucket

Most recently (December?) I added the shoulder pads and finished bulking out the mass there, though as I mentioned above, I seem to have taken the picture between adding the shoulder pads and bulking them up as they're not bulked up in the picture, which is odd as it was all done as the same step in my mind. Also, for those curious, I took his picture with a terminator from the Black Reach set:
Photobucket
Photobucket
He looks kinda funny without the extra rolls around the shoulder pads. I'll have to take a new picture and post that at some point.

Eventually, I'll add many many pustules and oozing sores to it. Probably.